Algebra
Worksheet Tutorial - Page 1
Part I: Creating the header
In many math documents we want to start with a title. We want to title the
test, worksheet, quiz, or review we are giving�..

To create the title of our project we need to open the Equation/Text
Editor.
STEP 1:
Right Click on the Composer Screen
Point to Insert
Click on Text & Equation
Now a new window with the equation/text editor opens.
When the equation/text editor opens, the default font setting is New Times
Roman, size 12
Let�s make our title a different font and size.
STEP 2:
Click on the font button
in the toolbar of the equation/text editor.
From the font box that appears choose Garamond from the
Font Name box and 18 in the Font Size box.
Click OK to close the font box.
STEP 3:
Type in your text:
Math Composer Sample Algebra Worksheet
After typing in your text, close the equation/text editor by clicking
on the
 in the top
corner in the top
corner
You will now have a text box on the composer screen.
TIP: If you want to change the text in that box, simply
double click on it and the equation/text editor will re-open and you
can edit or add text.
TIP: If you want the text bigger or smaller, click on
the text box once to highlight it, then click on and drag the
sizing handle at the bottom right corner of the text box (the mouse
pointer will change into
 ). Release mouse button when the object is the desired size.
Having second thoughts about the resizing you did, select the text
box, right click on it and then select Restore Defaults.
STEP 4:
Practice creating and using text boxes by repeating steps 1 � 3 to three
times to create 3 additional separate text boxes; one for each of the
following text items:
Name _________________ (I used Times New Roman font size 16)
Date ____________ (I used Times New Roman font size 16)
Please read all directions carefully. (I used Times New Roman font size
12)
STEP 5:
Now you have 4 text boxes that you can click and drag around to
move wherever you want on the page. Move them up near the top and arrange
them roughly how I did in the sample.
You may want them all to line up nicely - Align the Objects. (See
align objects)
Part II: Create Problem # 1
STEP 1:
Insert a new Equation/Text Box.
Right
Click on the Composer Screen
Point to Insert
Click on Text & Equation
Now a new window with the equation/text editor opens.
When the equation/text editor opens, the default font setting is New Times
Roman, size 12
Let�s make our text a different size.
STEP 2:
Click on the font button in the toolbar of the
equation/text editor.
The Font Toolbox appears.
Choose 14 point font.
Click OK to close the font box.
STEP 3:
Type in your text:
#1. Write the letter of the line that corresponds to each equation in
the space provided.
After typing in your text, Close the equation/text editor by clicking on
the
in the top
corner
You will now have a text box on the composer screen.
TIP: If you want to change the text in that box, simply
double click on it and the equation/text editor will re-open and you
can edit or add text.
STEP 4:
We
will create the grid.
Right Click on the Composer Screen
Point to Insert
Click on Figure
Now a new window with the figure editor opens.
STEP 5:
In the figure box, choose Edit Grid from the Grid Menu
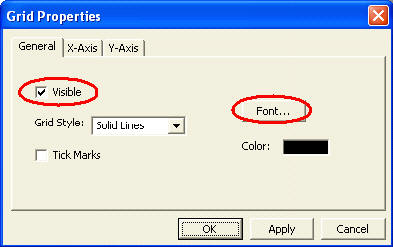 The
grid properties box will appear. The
grid properties box will appear.
Make sure the box by Visible is checked.
Click on the font button to get the font box and choose
Arial, Bold, and size 8
 Click
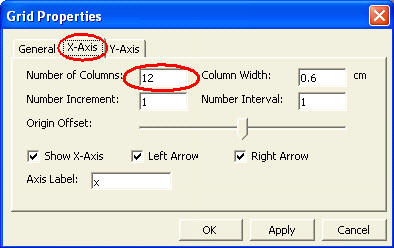
on the X-Axis Tab in the grid Properties box and make sure: Click
on the X-Axis Tab in the grid Properties box and make sure:
The # of columns is 12
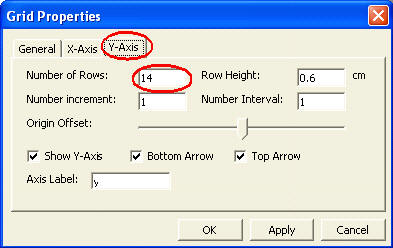
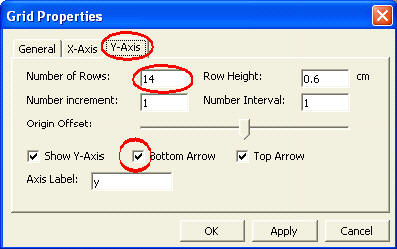
Click on the Y-Axis Tab in the grid Properties box and make
sure:
The # of columns is 14
Now Click OK to close the Edit Grid Box
STEP 6:
Now add graphs to the grid.
In the figure box, choose Graph from the Grid Menu
The Graph box will appear.
 We
want to draw 4 graphs in this grid so go ahead and Click on Add
Graph 4 times. We
want to draw 4 graphs in this grid so go ahead and Click on Add
Graph 4 times.
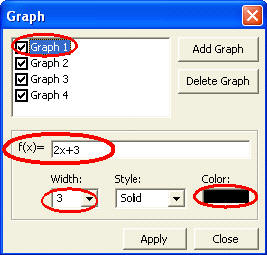
Now click on Graph 1 so it is highlighted and fill in the
equation and select style preferences as shown in the figure to the
right.
Click on Apply and the graph will appear.
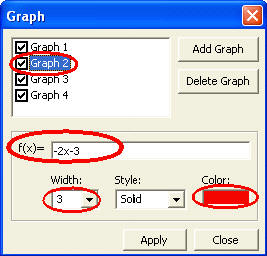
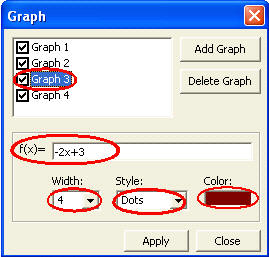
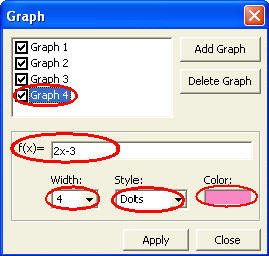
Now click on Graph 2, Graph 3 and Graph 4 and
fill in those equations and preferences as shown below:
Click on Apply and the graphs will appear.
When you are finished, click Close to close the graph window
and return to the figure editor.
Click the
to close
the figure editor and the grid appears on your page.
STEP 7:
Now we need to add the equations. We need to insert a new
equation/text box�
Follow Steps 1 � 2 above to open a new equation/text editor window. Set
the font to New Times Roman, font size 20.
 We
want to write an equation, so from the Edit Menu in the
Equation/Text Editor, choose Equation Mode. We
want to write an equation, so from the Edit Menu in the
Equation/Text Editor, choose Equation Mode.
Now type the first equation with a line after it so there is a spot for
the student to put the answer.

After typing in your text, Close the equation/text editor by clicking
on the
in the top
corner
You will now have a text box on the composer screen.
STEP 8:
TIP: We want to write three other very similar equations�. So
let�s just copy the text box we just created and paste it 3
times on the Composer.
 Click
on the Equation Text box once to highlight it, then Right Click on
it and choose Copy Click
on the Equation Text box once to highlight it, then Right Click on
it and choose Copy
Now Right Click anywhere on the Composer Screen and Select
Paste.
Repeat 2 more times until you now have 4 text boxes with:
Pick one of the boxes and double click on it so the Equation/Text
Editor opens, change the y = 2x + 3 to y = 2x � 3
Pick another one of the boxes and double click on it so the
Equation/Text Editor opens, change the y = 2x + 3 to y = -2x + 3
Pick another one of the boxes and double click on it so the
Equation/Text Editor opens, change the y = 2x + 3 to y = -2x � 3
Perfect, now you have the four equations you want. Now we just have to
arrange them on the page.
STEP 9:
Just Click and Drag all the objects to the desired place on the
page.
You may want them all to line up nicely - Align the Objects. (See
align objects)
Part II: Create Problem # 2

STEP 1:
Insert
a new Equation/Text Box.
Right Click on the Composer Screen
Point to Insert
Click on Text & Equation
Now a new window with the equation/text editor opens.
When the equation/text editor opens, the default font setting is New Times
Roman, size 12
Let�s make our text a different size.
STEP 2:
Click on the font button in the toolbar of the
equation/text editor.
The Font box will appear. Choose 14 point font.
Click OK to close the font box.
STEP 3:
Type in your text:
#2. Find the distance from Point A to Point B (show your work)
After typing in your text, Close the equation/text editor by clicking
on the
in the top
corner
You will now have a text box on the composer screen.
TIP: If you want to change the text in that box, simply double click
on it and the equation/text editor will re-open and you can edit or add
text.
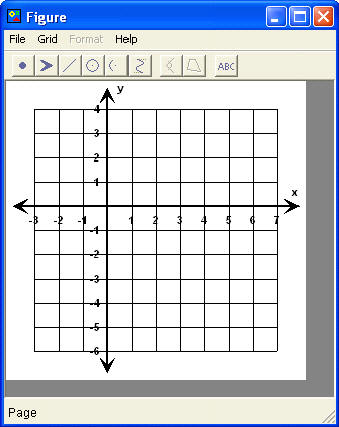
STEP 4:
We will create the grid.
Right
Click on the Composer Screen
Point to Insert
Click on Figure
Now a new window with the figure editor opens.
STEP 5:
In the figure box, choose Edit Grid from the Grid Menu
The grid properties box will appear.
Make
sure the box by Visible is checked.
Click on the font button to get the font box and choose
Arial, Bold, and size 8
 Click
on the X-Axis Tab in the grid Properties box and make sure: Click
on the X-Axis Tab in the grid Properties box and make sure:
The Origin Offset Slider is moved to -2.
 Click
on the Y-Axis Tab in the grid Properties box and make sure: Click
on the Y-Axis Tab in the grid Properties box and make sure:
The Origin Offset Slider is moved to +1.
Now Click OK to close the Edit Grid Box
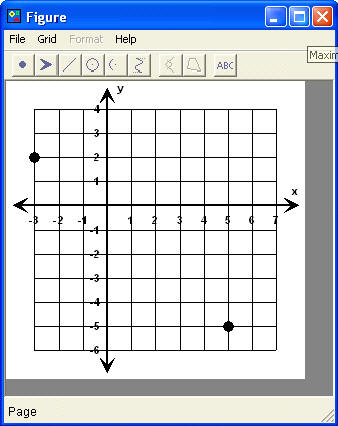
STEP 6:
 Add
the points to the grid in the Figure Editor Add
the points to the grid in the Figure Editor
Click on the Point button in the figure editor and a line
will appear.

Click on the point to select it
Right Click on that point again and select Size. When
the size box opens up, type in 5.
Right Click on that point and select Aligned.
Click and drag the point to ( -3 , 2 )
Repeat this process to create another point and click and drag the
new point to ( 5 , -5 )
STEP 7:
Label the Points
 Click
on the label button in the figure editor and the label box will
appear Click
on the label button in the figure editor and the label box will
appear
Type A in the box and check the Bold box.
Then click OK.
Click and drag the label to your desired location.
Repeat this process to create another label for point B and click and drag
it to your desired location.
Click the
to close
the figure editor and the grid appears on the Composer Screen.
STEP 8:
Just Click and drag all the objects to the desired place on the page.
You may want them all to line up nicely: Align the Objects. (See
align objects) |