Curly Braces
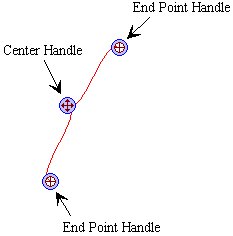
A Curly Brace is defined by it's two end-point handles. A Curly Brace can be moved by moving its end-points or by moving the Curly Brace itself (using the handle located in the middle).

Insert a Curly Brace
-
Click on Curly Brace button
 on the Toolbar.
Note: You can also insert a Curly Brace by:
From Grid menu, point to Insert and select Curly Brace, or
Right-click somewhere in the figure editor, point to Insert and select Curly Brace.
Select a Curly Brace
-
Click on a Curly Brace (either end or the middle) that you wish to select (Curly Brace turns red when selected and its handles appear)
Note: To deselect a Curly Brace click elsewhere on the figure editor screen.
Change Curly Brace Depth Size
-
Select Curly Brace
-
Place pointer over Curly Brace handle and right-click. Select Size.
-
Size dialog box appears. Move slider to change the depth size or type size number into textbox. Close Size dialog box.
Change Curly Brace Line Style
-
Select Curly Brace
-
Place pointer over Curly Brace handle and right-click. Select Line Style.
-
Click on the style you desire.

Change Curly Brace Line Width
-
Select Curly Brace
-
Place pointer over Curly Brace handle and right-click. Select Line Width.
-
Size dialog box appears. Move slider to change point size or type size number into textbox. Close Size dialog box.
Change Curly Brace Color
-
Select Curly Brace
-
Place pointer over Curly Brace handle and right-click. Select Color.
-
Color dialog box appears. Click on the color you desire. Click on Ok.
Make Curly Brace Invisible
-
Select Curly Brace
-
Place pointer over Curly Brace and right-click. Select Visible.
-
To make Curly Brace visible again, repeat previous two steps.
Note: When an object is visible, there is a check next to visible in the right-click menu.
Delete Curly Brace
-
Select Curly Brace
-
Place pointer over Curly Brace and right-click. Select Delete.